On this site, we have discussed how 3D Printers can enhance various aspects of your library’s programming and how to create important partnerships for implementation. Indeed, 3D Printers can improve the library experience for all involved. However, what happens when that printer comes to a screeching/beeping halt? After two years of maintaining our printers, Makerbot Replicator 2 and Tinkerine Ditto Pro, and thanks to the kind donations of library patrons, I have assembled a toolbox that has eased daily maintenance and disassembly.
The post is broken up into sections covering tools for the following aspects:
Each section also looks at pricing for these tools and alternatives.
Tools for: Plate
THE TAPE
Not all of us can afford to wait for flexible platforms and we must make do with laying down some painter’s tape to ease the object removal. At first we would use standard-sized tape which would require about 8 strips to fully cover either platform. A few months ago someone graciously donated a roll of 3M ScotchBlue Painter’s Tape Superwide Roll that has made it just a two strip process: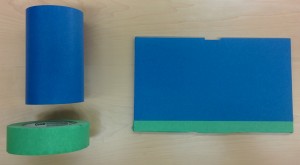
As you can see, the Superwide covers the majority of the Makerbot plate and a single strip of regular sized painter’s tape finishes the job.
Layout is also important. We place the thinner strip at the forefront where both printers clear their extruders before starting a print job. This allows us to replace the highly-used section of the platform at near daily intervals while the larger portion is only replaced when there is significant wear. This is also a cost saving measure as the Superwide variety can be nearly $50 per roll, and minimizing its replacement is vital. Utilizing this method allows me to stretch two rolls for four months, despite the printers actively printing out 3-4 jobs per day. If you are tight for funds, there is also 3DXTech’s XL Blue Painters Tape worth considering, which is half the price but with mixed reviews.
THE SCRAPER
Both of our printers use PLA 1.75MM filament and while that does give some 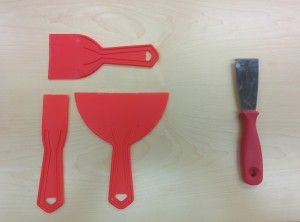 flexibility in removing items from the platform, it can still be a pain to remove flat thin objects. Paint scraper to the rescue! At first we tried a cheap plastic scraper set (the red ones) but their edges were too soft. Upgrading to a metal 1.5 inch scraper provided much better results. While it does have a tendency to damage the tape, thus reducing the re-usability of said tape, it provided enough strength to wedge a gap in mere seconds. As for pricing, metal 1.5 inch scrapers can be found for less than $5.
Tools for: Fine Tuning Prints
For print jobs that required a bit of polish, we turned to three trusty friends: scissors, X-ACTO knife, and sandpaper.
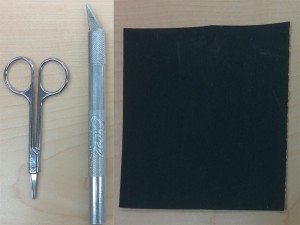
The small scissor allows you to cut through thin pieces, such as supports or excess filament. The X-ACTO knife is called in for situations like stubborn raft pieces. Finally, the sandpaper can smooth out imperfections. Combined, all three will give your print a much finer look and prevent broken nails. Additionally, all of these pieces are easy to come by and should be no more than a few dollars each.
Tools for: Gripping
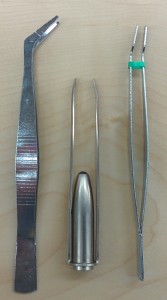 These tools are recommended for any situation that requires a delicate and firm grip. For the most part this occurs when small bits of filament are left in and around the extruder. In these situations we use a wide range of tweezers and pincers. These tools are easily found in any craft store or online. We found the flat head tweezers to provide the best grip on filament. Once again, these tools are quite affordable at around $3-5 each. Pick up one for now and add to your collection as required.
Tools for: Disassembly
The web will likely have an abundance of video and text resources on how to fix the exact issue for your printer. Avoid the temptation of these “quick fixes” first and check your manufacturer’s support site. I found quite a few answers to our Makerbot2 problems on their excellent support site. However, you should also be aware that the day will come when you will need to disassemble the magical device.
For the most part, 3D Printers come with everything you need. What they can lack are clear instructions on how to disassemble, let alone what tools you need, and even such great resources as ifixit.com fail to cover this vital maintenance aspect. It should be noted that the following tools are only needed if your warranty is already void. Some provider’s warranties will not even let you disassemble simple housing areas. Read those warranty guidelines that might be conveniently located in the bottom of the now discarded box, or on their support sites. All clear?
SCREWDRIVERS – Phillips & Flathead
Alright, so the first thing you want to purchase is a screwdriver set that contains 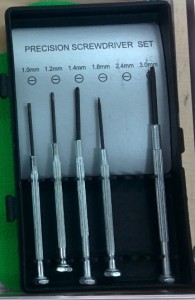 a variety of bit sizes. This allows you to tackle devices whose manufacturer decided that a different size was required for the shell, extruder, panels, board, and warning label. Again, you should really read any and all support documentation before attempting to use these tools. Our aptly named Precision Screwdriver Set, which covers 1.0mm through 3.0mm, has opened up a few areas on the machines. Just do a quick search on Amazon and find a set that fits your budget and needs, such as the $7 Herco HE826 Precision Screwdriver Set or $5 for the Stanley 66-039 6-Piece Set.
SCREWDRIVERS – Hex
We also ran into areas, namely the extruder, which required a screwdriver with hex bits. 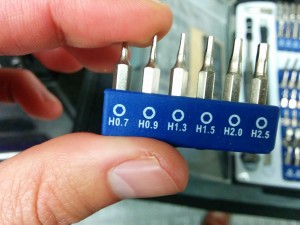 For these advanced areas (did I mention you should really read those support documents?) we turned to the 54 Bit Driver Kit from iFixit.com’s store. This set also includes a flexible driver that made it easy to work with in the printer’s cramped areas.
The set is perfect for 3D Printers as it also contains flathead and Phillips bits of all sizes. It can easily cover the majority of your disassembly needs. At $25 it is definitely the pricier of the three sets but I highly recommend it due to the quality of the tools and the diverse sizes.
Final Cost
After all that, you are probably asking yourself: “how much is this going to cost me?” Let me break it down for you in a handy table.
RECOMMENDED TOOLBOX
| Item |
Cost |
| 3M ScotchBlue Painter’s Tape Superwide Roll |
$50 |
| Metal 1.5 inch Scraper |
$5 |
| Small Scissor |
$5 |
| X-Acto #2 Knife |
$6 |
| Flat Tweezer |
$5 |
| 54 Bit Driver Kit |
$25 |
|
$96 |
ALTERNATIVE TOOLBOX
|
Item |
Cost |
| 3DXTech’s XL Blue Painters Tape |
$25 |
| Metal 1.5 inch Scraper |
$5 |
| Small Scissor |
$5 |
| X-Acto #2 Knife |
$6 |
| Flat Tweezer |
$5 |
| Stanley 66-039 6-Piece Screwdriver Set |
$6 |
|
$52 |
The contents and size of your 3D Printer Toolbox will come down to your needs and the model you use. I am allowed some freedom in dissembling our printers to fix small issues, like filament jams, and the high use of our machines means I am changing out the plate tape every few hours. Both of these requirements are reflected in the higher quality (and thus higher priced) emphasis of the plate and disassembly sections. You might find that your printer needs finer tweezers to reach certain areas and for other functions. A 3D Printer is a massive financial and time investment, so remember to save some funds to ease your interaction with them.